
Well Andrew and I have taken some time off from the VW Bug. Work is very busy and keeping us away from shop time. We did, however, strip the entire vehicle to its last bolt/nut and have sorted out the parts we need, most of which have arrived.
The body has been dropped off to be media blasted so we can see how much metal needs to be replaced. That will take about a month to turn around so our focus will be on the chassis. Since welding is not a thing I can do with Andrew I'll have to find some late nights to get the floor pans in and then he can help me with the reassembly.
Stay tuned....
Monday, May 25, 2009

Thursday, May 7, 2009
Stuff is Arriving!
Well no pics or anything interesting but parts are now starting to arrive. Looks like a full week of waiting to begin some reassembly as Sunday is Mother's Day and we won't be working on Herbie.
Stay Tuned...
Stay Tuned...
Sunday, April 26, 2009
Day 15 - Transaxle Removal

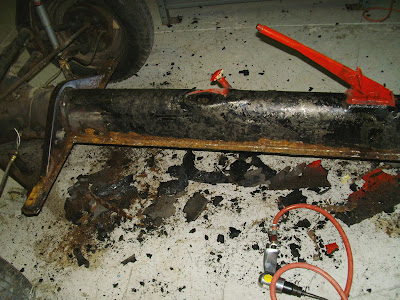
Well I did sneak in a little time to scrub down the center tube of the frame that had all the tar built up on it. Made short work of it with the wire wheel on the grinder, but what a mess.


Sunday (today) Andrew and I went to tackle the transaxle which is the only major component left on the frame. We had to go buy a properly sized socket (27mm) and then headed to the shop. What a mess this has become thanks to the grinding but within 15 minutes we had the mounts out and the transmission in the back of the truck. I thought we'd pressure wash the gunk off of it at the local DIY carwash. That was a disaster with the gunk flying every which way. Think we'll just go get a parts washer and clean it up as we dissasemble the gears.
Well, as you can see the frame is about down to it's core at this point. I'll have to order some floor pans to weld in but that will be a week or so off in the distance. In the meantime I'll be getting some of the front suspension back from powder coating and will begin putting that together.


Stay tuned...
Day 13 - Front Beam Removal
Not much time to work on Herbie this week but found an hour last Thursday night to remove the front beam. This is basically the front suspension and steering linkage that bolts to the front of the frame.

Trying to get the car in position so that Andrew and I can do something noticeable on Sunday - no kid wants to sit around and watch their father use a grinder for a couple of hours. That said we're going to try to remove the transaxle on Sunday afternoon which, as you can see, is covered with 46 years of muck.

Tuesday, April 21, 2009
Day 10 - Floor Pan Cleanup
Worked late and Andrew had a playdate. When I got back to the shop I did a bit of work and then spent 30 minutes on the Bug. Using the air chisel I removed the spot welds that held the old floorboards to the chassis. I also nipped away at the tar mat that surrounds the center tube. Short work, bad smell but quick progress.
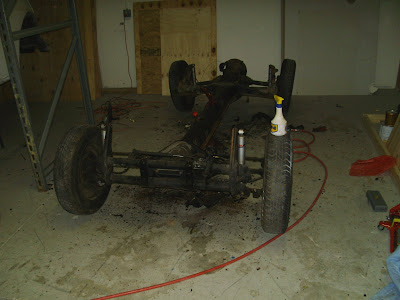


My goal is to have the car "ready" for the front suspension removal on Sunday. This is something I know Andrew will like doing as he's been patiently waiting to "remove the wheels" which for those of you not in the know, is the pinnacle of car restoration - 5yr old style.
Monday, April 20, 2009
Day 9 - Floor Pan Removal
While we had no plans to work on Herbie until next Sunday, Andrew and I had a little itch and stopped by the shop tonight for a quick little project - removing those nasty old floor pans.

We started after hours with pushing Herbie's chassis out from under the suspended body and into the adjoining bay where we could freely work on the floor pans. We then removed the pedal assembly, brake lines and battery cables.


With our hearing and eye protection in place we set to removing the floor pans, trying several tools to get the job done. The air chisel made little progress and the pneumatic nibbler wasn't effective on the curved panels. Our third choice was the grinding wheel which was nothing short of a pyrotechnical extravaganza, but a bit smelly with the undercoating burning. Our saviour - the Sawzall and a couple of metal blades.

What remains is some cleanup work which I'll hit sometime before Sunday since it's all grinding and not a lot of fun for Andrew. Then we can remove the front beam (the front suspension/axles) and dissassemble them for cleanup and paint.


Stay tuned....

We started after hours with pushing Herbie's chassis out from under the suspended body and into the adjoining bay where we could freely work on the floor pans. We then removed the pedal assembly, brake lines and battery cables.


With our hearing and eye protection in place we set to removing the floor pans, trying several tools to get the job done. The air chisel made little progress and the pneumatic nibbler wasn't effective on the curved panels. Our third choice was the grinding wheel which was nothing short of a pyrotechnical extravaganza, but a bit smelly with the undercoating burning. Our saviour - the Sawzall and a couple of metal blades.

What remains is some cleanup work which I'll hit sometime before Sunday since it's all grinding and not a lot of fun for Andrew. Then we can remove the front beam (the front suspension/axles) and dissassemble them for cleanup and paint.


Stay tuned....
Sunday, April 19, 2009
Day 8 - Body Removal
First of all I want to thank my restoration partner, part-time photographer and son Andrew for spending six hours with me and never complaining. When I was a kid it seemed I got to hold a flashlight for hours and get yelled at for handing the wrong tool. This kid is a natural in the shop!


Today was a very busy Sunday but lucky for me I had my best helper at my side to aide with some major tasks. We started the day running some errands and getting the new compressor up and running - a tool that is going to play a large roll not only on this rebuild, but with the shop overall. Once we had that in place we took to removing the remainder of the items prior to splitting the chassis.
We removed:
- The gas tank and fuel sender unit
- The steering column
- Brake fluid reservoir
- The shifter
- Some other miscellaneous bits and parts
We then set up the makeshift Gantry to lift the body off the chassis. For those of you unfamiliar with VW Beetles they are basically a shell on top of a rolling chassis that has the floor pans and all mechanical items on it. That is why so many kit cars are made off of VW chassis - the top is mainly the cosmetic (yet structural) element.


With four 1,600lb straps wrapped at multiple points to each pillar section I used two puller straps to hoise both the front and rear positions. Removal of the body, I'm told, requires the removal of some 18 bolts from the underside. This car had about seven in place - lovely.
Sometime in the next week we'll be rolling the chassis out into the other bay and begin stripping the suspension components and inspecting the components. We will most likely will get these items sandblasted and powdercoated for a rugged finish. As you can tell by the photos the underside is hmmm.... manky. Lots of cleaning, blasting and sheet metal replacement is in the future for this car. As you can see this will be a full nut/bolt restoration with no corners cut (hopefully).
Stay Tuned....
Subscribe to:
Posts (Atom)