Sunday, April 26, 2009

Day 15 - Transaxle Removal


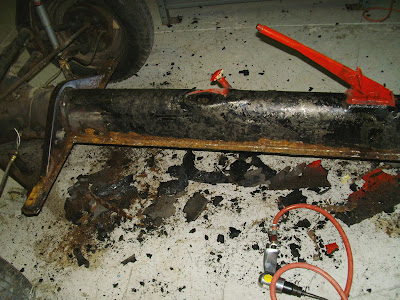
Well I did sneak in a little time to scrub down the center tube of the frame that had all the tar built up on it. Made short work of it with the wire wheel on the grinder, but what a mess.


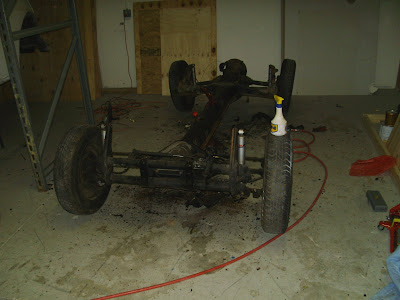
Sunday (today) Andrew and I went to tackle the transaxle which is the only major component left on the frame. We had to go buy a properly sized socket (27mm) and then headed to the shop. What a mess this has become thanks to the grinding but within 15 minutes we had the mounts out and the transmission in the back of the truck. I thought we'd pressure wash the gunk off of it at the local DIY carwash. That was a disaster with the gunk flying every which way. Think we'll just go get a parts washer and clean it up as we dissasemble the gears.

Well, as you can see the frame is about down to it's core at this point. I'll have to order some floor pans to weld in but that will be a week or so off in the distance. In the meantime I'll be getting some of the front suspension back from powder coating and will begin putting that together.


Stay tuned...

Day 13 - Front Beam Removal

Not much time to work on Herbie this week but found an hour last Thursday night to remove the front beam. This is basically the front suspension and steering linkage that bolts to the front of the frame.


Trying to get the car in position so that Andrew and I can do something noticeable on Sunday - no kid wants to sit around and watch their father use a grinder for a couple of hours. That said we're going to try to remove the transaxle on Sunday afternoon which, as you can see, is covered with 46 years of muck.


Tuesday, April 21, 2009

Day 10 - Floor Pan Cleanup

Worked late and Andrew had a playdate. When I got back to the shop I did a bit of work and then spent 30 minutes on the Bug. Using the air chisel I removed the spot welds that held the old floorboards to the chassis. I also nipped away at the tar mat that surrounds the center tube. Short work, bad smell but quick progress.


My goal is to have the car "ready" for the front suspension removal on Sunday. This is something I know Andrew will like doing as he's been patiently waiting to "remove the wheels" which for those of you not in the know, is the pinnacle of car restoration - 5yr old style.

Monday, April 20, 2009

Day 9 - Floor Pan Removal

While we had no plans to work on Herbie until next Sunday, Andrew and I had a little itch and stopped by the shop tonight for a quick little project - removing those nasty old floor pans.


We started after hours with pushing Herbie's chassis out from under the suspended body and into the adjoining bay where we could freely work on the floor pans. We then removed the pedal assembly, brake lines and battery cables.


With our hearing and eye protection in place we set to removing the floor pans, trying several tools to get the job done. The air chisel made little progress and the pneumatic nibbler wasn't effective on the curved panels. Our third choice was the grinding wheel which was nothing short of a pyrotechnical extravaganza, but a bit smelly with the undercoating burning. Our saviour - the Sawzall and a couple of metal blades.


What remains is some cleanup work which I'll hit sometime before Sunday since it's all grinding and not a lot of fun for Andrew. Then we can remove the front beam (the front suspension/axles) and dissassemble them for cleanup and paint.


Stay tuned....

Sunday, April 19, 2009

Day 8 - Body Removal

First of all I want to thank my restoration partner, part-time photographer and son Andrew for spending six hours with me and never complaining. When I was a kid it seemed I got to hold a flashlight for hours and get yelled at for handing the wrong tool. This kid is a natural in the shop!


Today was a very busy Sunday but lucky for me I had my best helper at my side to aide with some major tasks. We started the day running some errands and getting the new compressor up and running - a tool that is going to play a large roll not only on this rebuild, but with the shop overall. Once we had that in place we took to removing the remainder of the items prior to splitting the chassis.
We removed:
  • The gas tank and fuel sender unit

  • The steering column

  • Brake fluid reservoir

  • The shifter

  • Some other miscellaneous bits and parts

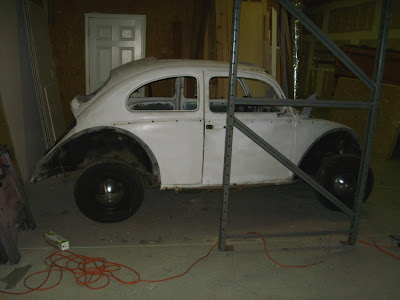
We then set up the makeshift Gantry to lift the body off the chassis. For those of you unfamiliar with VW Beetles they are basically a shell on top of a rolling chassis that has the floor pans and all mechanical items on it. That is why so many kit cars are made off of VW chassis - the top is mainly the cosmetic (yet structural) element.


With four 1,600lb straps wrapped at multiple points to each pillar section I used two puller straps to hoise both the front and rear positions. Removal of the body, I'm told, requires the removal of some 18 bolts from the underside. This car had about seven in place - lovely.

Sometime in the next week we'll be rolling the chassis out into the other bay and begin stripping the suspension components and inspecting the components. We will most likely will get these items sandblasted and powdercoated for a rugged finish. As you can tell by the photos the underside is hmmm.... manky. Lots of cleaning, blasting and sheet metal replacement is in the future for this car. As you can see this will be a full nut/bolt restoration with no corners cut (hopefully).


Stay Tuned....

Thursday, April 16, 2009

Day 5 - Body Panels and Trim


Today started out with me surprising my son (and wife) that I started this little journey of restoring the Bug. I took the long way to my son's pre-school and stopped by the office for him to visit. Let's just say I made the right decision - he's beside himself and wants to talk about the car, how to fix it and what colors to paint it (I had to nix the Tony Stewart #14 color scheme) in the end.


I found some areas of bondo - especially in the A pillar and the passenger door. Appears to be small damage and not the usual rust that encrusts the window's gasket. Didn't catc that on first inspection - oh well.


Next step will be to fabricate a holding frame that will keep the geometry when I lift the body off the chassis and fix new floor pans and heater channels which are a mess. That will probably hold off until Sunday which seems to be my only day with some free time.


As I get more into the restore/build procedures I will take more task oriented photos and not just progress shots. But as for taking apart a Bug its about as simple as turning a screwdriver or wrench until there are no more bolts.

Wednesday, April 15, 2009

Day 4 - Minor Progress

Today was the day I was going to unveil my new purchase to my wife and son (Andrew) who is an absolute car nut from the day he was born and at the age of five can tell me the make/model of almost any car on the road. One of his favorite movies of all time is ....Herbie the Love Bug. That said I wanted to ensure this was a car I am going to restore and not discard back into the market. I'm comfortable with the shape it is in and feel confident the work will not be all too complex - just time consuming. I can't think of a better thing for Andrew than to know he has a Herbie in his life and that he'll be part of saving it. (He saw the car advertised on thesamba.com and asked me to get it for us so we can wash him and put new oil in him). How could I resist and Bugs aren't like buying a car at Mecum or Barrett Jackson. The unveiling will have to wait until tomorrow since our night out for dinner ran late.

Since I had a busy work day I didn't get to spend time on the Bug until after dinner. I did, however, have time to stop by ProCryo earlier in the day. They are the shop that will be sandblasting the entire setup as time goes on. My first order of business will be to sort the engine out and get what parts are in good order over for blasting and either ceramic coating or powder coating. It will depend on the part and amount of heat built up.

ProCryo also does cryogenic metallurgy and isotropic coatings on engine parts. Mainly used for racing it provide a smother finish and a more durable part meant for high tolerances (OK - that's my simpleton's explanation anyway). I may have them work on some of the engine internals to help with longevity. You can visit them at www.procryo.com.

I was able to pull the front lights, side trim, window regulators and door hardware. I did have to employ a few "specialty" tools like the GraBit screw extractor on some stripped screws. The door catches had some real stubborn screws that took some heat from my MAPP tank.

I'm taking my time documenting everything I have and putting stuff in order the best I can. I've decided to use Lawn Yard Waste bags (huge triple-ply paper bags) to store my stuff. I figured they wouldn't trap humidity and would breath nicely. Who am I kidding - they are cheap and that's why I'm using them. Anything with some rust gets hit with some WD40 and goes in the bag. Each bag is numbered and referenced off the inventory spreadsheet so I know what I have, how much of it and what I'll need to buy.

Well - no pics today - forgot the camera. Will have some time tomorrow hopefully to keep pulling the bits off. Still looking to have the body/chassis divorced by Sunday.

Stay Tuned...

Tuesday, April 14, 2009

Day 3


Work has been busy so time into the Bug hasn't been all that great. I've spent a good deal of time acquiring tools I'll need for this job and getting things ready for the restoration. I'm at the point where I have most everything I'll need for a smooth restoration, albeit a long one. I've upgraded to a 11scfm compressor so I can use more air tools on the bodywork. Tools like my new pneumatic crimper and nibbler should help tremendously along with my existing grinders, cut off wheels and recipricating saws. A new Hobart MIG welder will help ease the bodywork panel replacement.

For the body removal I plan on using a commercial shelving unit. I have several of these in my warehouse and they are similar to those you see at Home Depot and Lowes. By moving the adjustable shelves towards the top I will have ample support, clearance and anchor points to strap the Bug's body and use a winch to draw it off the ground. Basically its like a Gantry crane without the mobility.

Today I spent about 90 minutes looking the car over and began with some easy items such as removing all the glass and the crusty old weatherstripping. Removing the back seat shows a decent deck, but the floor pans are an absolute mess - can't wait to get those going. Seems the owners before did some quick patches using flashing and Great Stuff. Not sure how great this stuff is as it's in places that I'm going to have a hard time picking it out of and hope the sandblaster can get in there.


Removing some of the old sunroof trim revealed the car's original color. A beautiful Torquoise (Color Code L380) which is what this care will most likely end up - perhaps with White Pearl two-tone.


Well - as usual a couple of pics. Stay tuned...

Monday, April 13, 2009

Day 2 - Quick Inventory


Well now that the Bug is in its new home it was time to take a more serious look at the damage. While I could list all the areas of concern I will tell you that it would be shorter for you to read the list of acceptable areas...

The engine code does verify as a 1963 1200cc original engine which is nice, except parts are fewer and farther between than the more common 1600cc engine. The downside is that this engine is dissassembled and in a couple of boxes. I've verified the major parts but some fasteners, clips and springs may need to be procured, but anything that's wear/tear will be new.


The body is best described at iron oxide with hints of a 1963 VW Ragtop thrown in for cosmetics. The chassis will needs some attention and will be receiving all new floor pans and blast/powdercoat finish. The body needs new lower door skins, new fenders all around (they are very reasonably priced) and some work on the A Pillars. I suspect there will be more to find once the body is off and back from the sandblaster.


The front beam is in good order and will also be disassmbled and powdercoated. And the many little bits will need to be sorted and re-plated or bought anew. Well, the first order of business will be to strip the bug down, boxing all the pieces with proper labeling and then working towards splitting the body from the chassis. I plan to have that completed by week's end given sufficient after hours time.

Sunday, April 12, 2009

Why Blog?


Hello and thanks for visiting my blog where I will attempt to document a full restoration on a 1963 VW Ragtop. While there are countless VW resources online it is my intent to use this forum as a consolidator of information for the many aspects I will run into during the project.

If you have any feedback or suggestions for the work at hand please feel free to contact me. I expect the project to take 10-12 months to get to a near fully restored and drivable condition. Now, to understand how much work is at hand let's talk about the car.

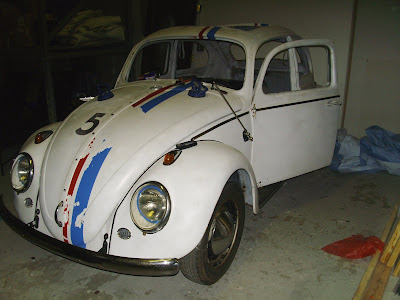
I took delivery on 4/11/2009 of a 1963 VW Beetle Ragtop. What appeals to me about this car is that it is an original ragtop and not an aftermarket weld-in kit. That said, the car is in very sad shape, with the usual suspects rearing their ugly heads. Rust, dents, missing parts, disassembled engine all will need to be sorted. Having bought this car at auction I've found that some items were not disclosed such as massive amounts of bondo in certain areas and questionable repairs. Fine by me - the greater the challenge, the greater the journey!

In it's current configuration you can see it was roughly converted into a "Herbie" however I will most likely attempt a restoration into original condition, less some common upgrades like 6v to 12v upgrade, stroker kit on the engine (40hp won't cut it) and the like. The original color was Torquoise and i will most likely paint it Torquoise/White Pearl two-tone.

Let's hope that today's enthusiasm remains through the coming months....